
What Is Robots.txt?
Robots.txt is a text file with instructions for search engine robots that tells them which pages they can and cannot crawl.
These instructions are specified by “allowing” or “disallowing” the behavior of certain (or all) bots.
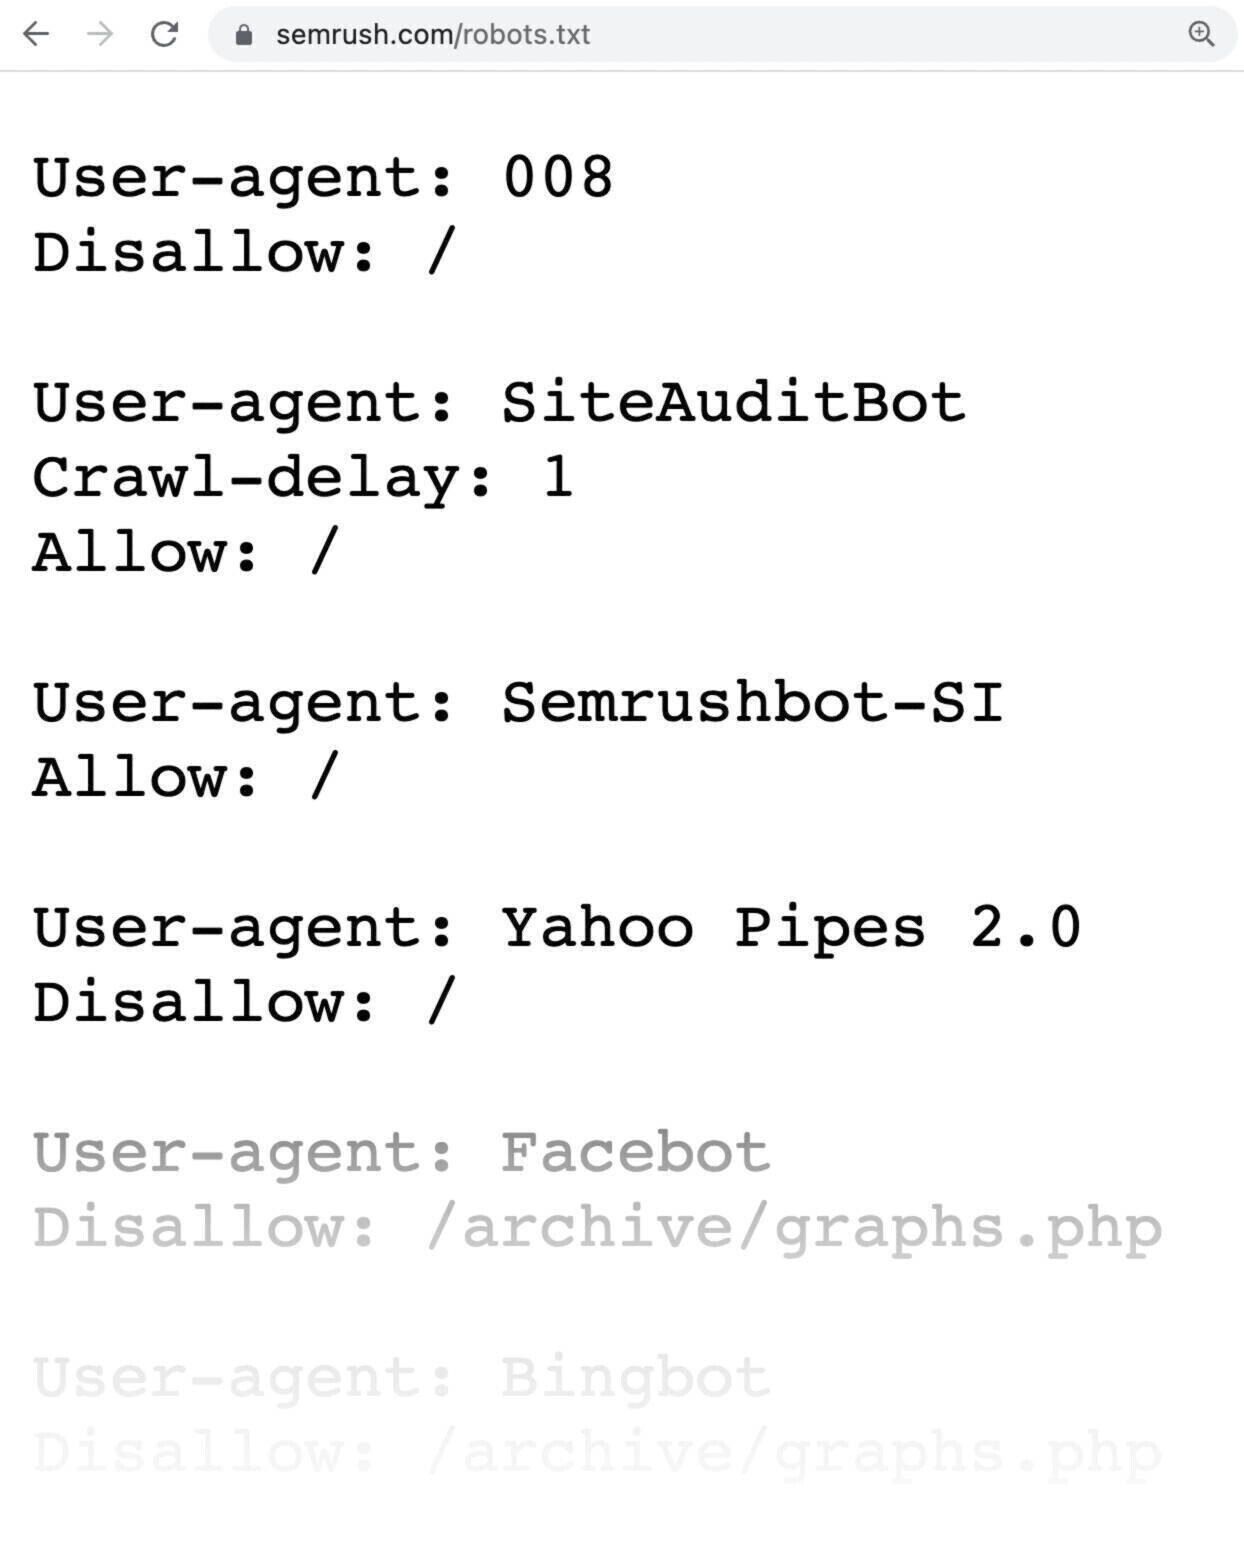
This is what a robots.txt file looks like:
Robots.txt files might initially seem complicated, but the syntax (computer language) is quite simple. We’ll get into those details later.
In this article we’ll cover:
- Why robots.txt files are important
- How robots.txt files work
- How to create a robots.txt file
- Robots.txt best practices
Why Is Robots.txt Important?
A robots.txt file helps manage web crawler activities so they don’t overwork your website or index pages not meant for public view.
Here are a few reasons why you’d want to use a robots.txt file:
1. Optimize Crawl Budget
“Crawl budget” is the number of pages Google will crawl on your site at any time. The number can vary based on your site’s size, health, and backlinks.
Crawl budget is important because if your number of pages exceeds your site’s crawl budget, you’re going to have pages on your site that aren’t indexed.
And pages that don’t get indexed aren’t going to rank for anything.
By blocking unnecessary pages with robots.txt, Googlebot (Google’s web crawler) can spend more of your crawl budget on pages that matter.
2. Block Duplicate & Non-Public Pages
You don’t need to allow search engines to crawl every page on your site because not all of them need to rank.
Examples include staging sites, internal search results pages, duplicate pages, or login pages.
WordPress, for example, automatically disallows /wp-admin/ for all crawlers.
These pages need to exist, but you don’t need them to be indexed and found in search engines. A perfect case where you’d use robots.txt to block these pages from crawlers and bots.
3. Hide Resources
Sometimes you’ll want Google to exclude resources like PDFs, videos, and images from search results.
Maybe you want to keep those resources private or have Google focus on more important content.
In that case, using robots.txt is the best way to prevent them from being indexed.
How Does a Robots.txt File Work?
Robots.txt files tell search engine bots which URLs they can crawl and, more importantly, which ones they can’t.
Search engines have two main jobs:
- Crawling the web to discover content
- Indexing content so it can be shown to searchers looking for information
As they crawl, search engine bots discover and follow links. This process takes them from site A to site B to site C across billions of links and websites.
Upon arriving on any site, the first thing a bot will do is look for a robots.txt file.
If it finds one, it will read the file before doing anything else.
If you recall, a robots.txt file looks like this:

The syntax is very straightforward.
You assign rules to bots by stating their user-agent (the search engine bot) followed by directives (the rules).
You can also use the asterisk (*) wildcard to assign directives to every user-agent. Meaning the rule applies to all bots, rather than a specific one.
For example, this is what the instruction would look like if you wanted to allow all bots except DuckDuckGo to crawl your site:

Note: While a robots.txt file provides instructions, it can’t enforce them. It’s like a code of conduct. Good bots (like search engine bots) will follow the rules, but bad bots (like spam bots) will ignore them.
How to Find a Robots.txt File
The robots.txt file is hosted on your server, just like any other file on your website.
You can see the robots.txt file for any given website by typing the full URL for the homepage and then adding /robots.txt, like https://semrush.com/robots.txt.

Note: A robots.txt file should always live at the root of your domain. So, for the site www.example.com, the robots.txt file lives at www.example.com/robots.txt. Anywhere else, and crawlers will assume you don’t have one.
Before learning how to create a robots.txt file, let’s look at the syntax they contain.
Robots.txt Syntax
A robots.txt file is made up of:
- One or more blocks of “directives” (rules);
- Each with a specified “user-agent” (search engine bot);
- And an “allow” or “disallow” instruction
A simple block can look like this:
User-agent: Googlebot
Disallow: /not-for-google
User-agent: DuckDuckBot
Disallow: /not-for-duckduckgo
Sitemap: https://www.yourwebsite.com/sitemap.xml
The User-Agent Directive
The first line of every block of directives is the “user-agent,” which identifies the crawler it addresses.
So, if you want to tell Googlebot not to crawl your WordPress admin page, for example, your directive will start with:
User-agent: Googlebot
Disallow: /wp-admin/
Keep in mind that most search engines have multiple crawlers. They use different crawlers for their normal index, images, videos, etc.
Search engines always choose the most specific block of directives they can find.
Let’s say you have three sets of directives: one for *, one for Googlebot, and one for Googlebot-Image.
If the Googlebot-News user agent crawls your site, it’ll follow the Googlebot directives.
On the other hand, the Googlebot-Image user agent will follow the more specific Googlebot-Image directives.
Go here for a detailed list of web crawlers and their different user-agents.
The Disallow Directive
The second line in any block of directives is the “Disallow” line.
You can have multiple disallow directives that specify which parts of your site the crawler can’t access.
An empty “Disallow” line means you’re not disallowing anything—so a crawler can access all sections of your site.
For example, if you wanted to allow all search engines to crawl your entire site, your block would look like this:
User-agent: *
Allow: /
On the flip side, if you wanted to block all search engines from crawling your site, your block would look like this:
User-agent: *
Disallow: /
Directives like “Allow” and “Disallow” aren’t case-sensitive, so it’s up to you to capitalize them or not.
However, the values within each directive are.
For example, /photo/ is not the same as /Photo/.
Still, you will often find “Allow” and “Disallow” directives capitalized because it makes the file easier for humans to read.
The Allow Directive
The “Allow” directive allows search engines to crawl a subdirectory or specific page, even in an otherwise disallowed directory.
For example, if you wanted to prevent Googlebot from accessing every post on your blog except for one, your directive might look like this:
User-agent: Googlebot
Disallow: /blog
Allow: /blog/example-post
Note: Not all search engines recognize this command. Google and Bing do support this directive.
The Sitemap Directive
The “Sitemap” directive tells search engines, specifically Bing, Yandex, and Google, where to find your XML sitemap.
Sitemaps generally include the pages you want search engines to crawl and index.
You can find this directive at the very top or bottom of a robots.txt file, and it looks like this:

That being said, you can (and should) also submit your XML sitemap to each search engine using their webmaster tools.
Search engines will crawl your site eventually, but submitting a sitemap speeds up the crawling process.
If you don’t want to, adding a “Sitemap” directive to your robots.txt file is a good quick alternative.
Crawl-Delay Directive
The “crawl-delay” directive specifies a crawl delay in seconds. It’s meant to stop crawlers from overtaxing a server (i.e., slowing your website down).
However, Google no longer supports this directive.
If you want to set your crawl rate for Googlebot, you’ll have to do it in Search Console.
Bing and Yandex, on the other hand, do support the crawl-delay directive.
Here’s how to use it.
If you want a crawler to wait 10 seconds after each crawl action, you can set the delay to 10, like so:
User-agent: *
Crawl-delay: 10
Noindex Directive
The robots.txt file tells a bot what it can or can’t crawl, but it can’t tell a search engine which URLs not to index and show in search results.
The page will still show up in search results, but the bot won’t know what’s on it, so your page will look like this:

Google never officially supported this directive, but SEO professionals still believed it followed the instructions.
However, on September 1st, 2019, Google made it crystal clear that this directive is not supported.
If you want to reliably exclude a page or file from appearing in search results, avoid this directive altogether and use a meta robots noindex tag.
How to Create a Robots.txt File
If you don’t already have a robots.txt file, creating one is easy.
You can use a robots.txt generator tool, or you can create one yourself.
Here’s how to create a robots.txt file in just four steps:
- Create a file and name it robots.txt
- Add rules to the robots.txt file
- Upload the robots.txt file to your site
- Test the robots.txt file
1. Create a File and Name It Robots.txt
Start by opening a .txt document with any text editor or web browser.
Note: Don’t use a word processor as they often save files in a proprietary format that can add random characters.
Next, name the document robots.txt. It must be named robots.txt for it to work.
Now you’re ready to start typing directives.
2. Add Directives to the Robots.txt File
A robots.txt file consists of one or more groups of directives, and each group consists of multiple lines of instructions.
Each group begins with a “User-agent” and has the following information:
- Who the group applies to (the user-agent)
- Which directories (pages) or files the agent can access
- Which directories (pages) or files the agent can’t access
- A sitemap (optional) to tell search engines which pages and files you think are important
Crawlers ignore lines that don’t match any of these directives.
For example, let’s say you want to prevent Google from crawling your /clients/ directory because it’s just for internal use.
The first group would look something like this:
User-agent: Googlebot
Disallow: /clients/
If you had more instructions like this for Google, you’d include them in a separate line just below, like so:
User-agent: Googlebot
Disallow: /clients/
Disallow: /not-for-google
Once you’re done with Google’s specific instructions, you can hit enter twice to create a new group of directives.
Let’s make this one for all search engines and prevent them from crawling your /archive/ and /support/ directories because they’re private and for internal use only.
It would look like this:
User-agent: Googlebot
Disallow: /clients/
Disallow: /not-for-google
User-agent: *
Disallow: /archive/
Disallow: /support/
Once you’re finished, you can then add your sitemap.
Your finished robots.txt file would look something like this:
User-agent: Googlebot
Disallow: /clients/
Disallow: /not-for-google
User-agent: *
Disallow: /archive/
Disallow: /support/
Sitemap: https://www.yourwebsite.com/sitemap.xml
Save your robots.txt file. Remember, it must be named robots.txt.
Note: crawlers read from top to bottom and match the first most specific group of rules. So, start your robots.txt file with specific user agents first, and then move on to the more general wildcard (*) that matches all crawlers.
3. Upload the Robots.txt File
After you’ve saved your robots.txt file to your computer, upload it to your site and make it available for search engines to crawl.
Unfortunately, there’s no universal tool that can help with this step.
Uploading the robots.txt file depends on your site’s file structure and web hosting.
Search online or reach out to your hosting provider for help on how to upload your robots.txt file.
For example, you can search for “upload robots.txt file to WordPress” to get specific instructions.
Here are a few articles explaining how to upload your robots.txt file in the most popular platforms:
After you upload the robots.txt file, check if anyone can see it and if Google can read it.
Here’s how.
4. Test Your Robots.txt
First, test if your robots.txt file is publicly accessible (i.e., if it got uploaded correctly).
Open a private window in your browser and search for your robots.txt file.
For example, https://semrush.com/robots.txt.
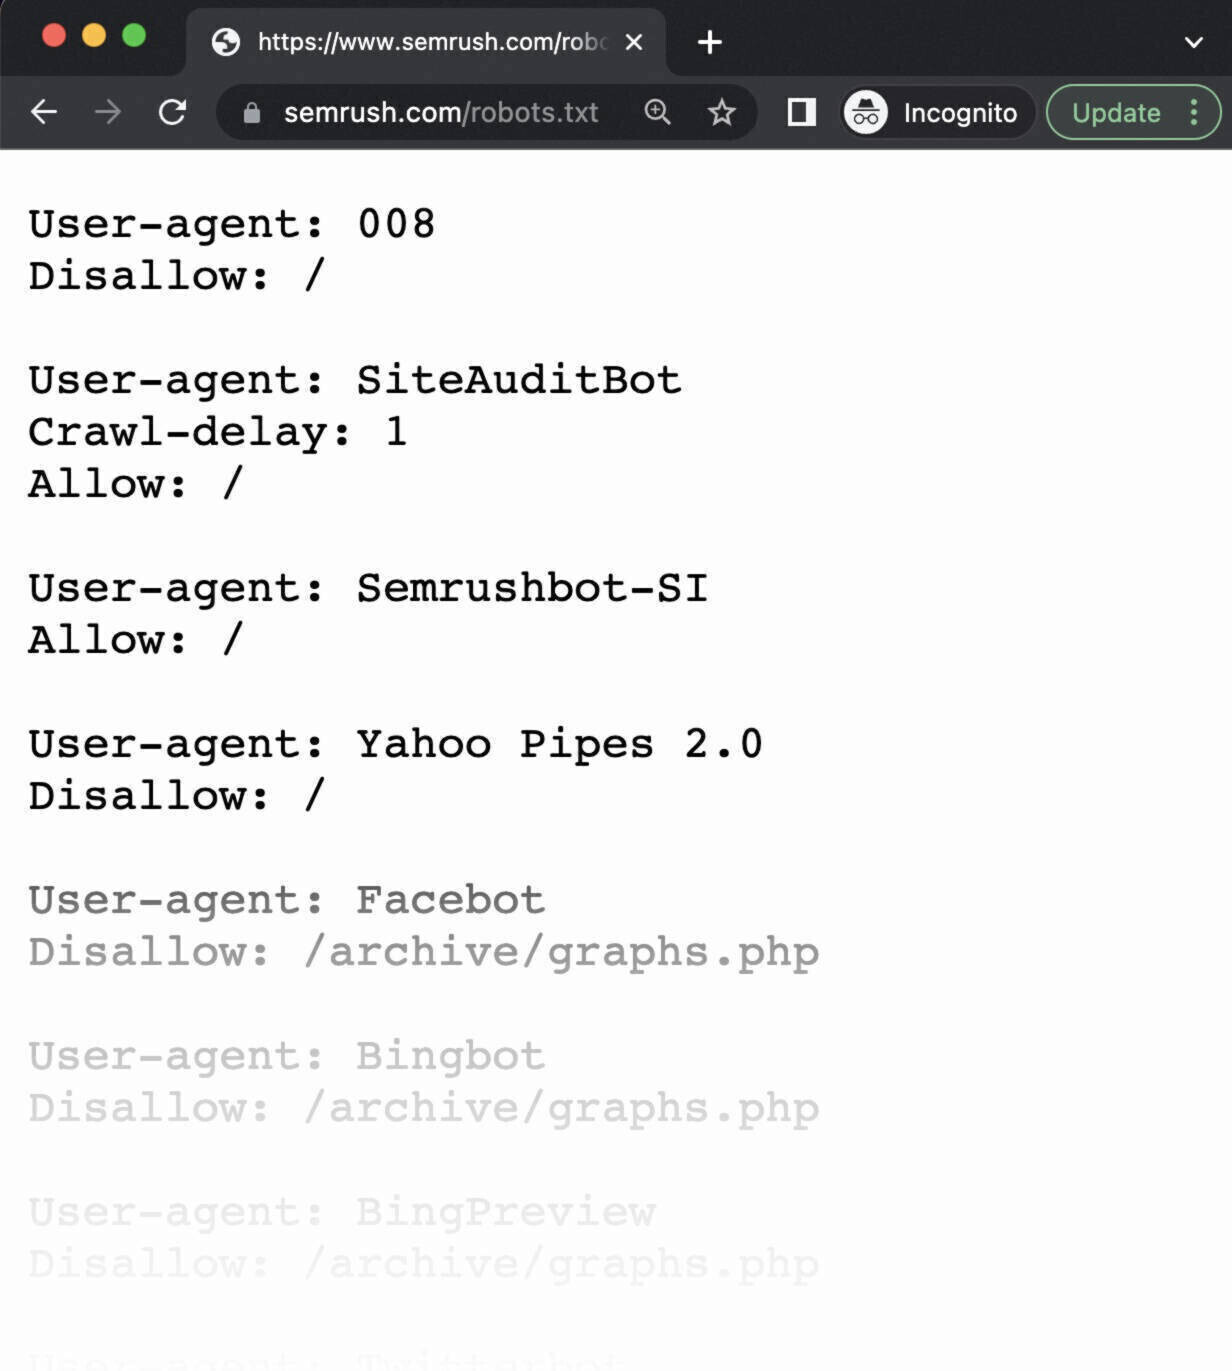
If you see your robots.txt file with the content you added, you’re ready to test the markup (HTML code).
Google offers two options for testing robots.txt markup:
- The robots.txt Tester in Search Console
- Google’s open source robots.txt library (Advanced)
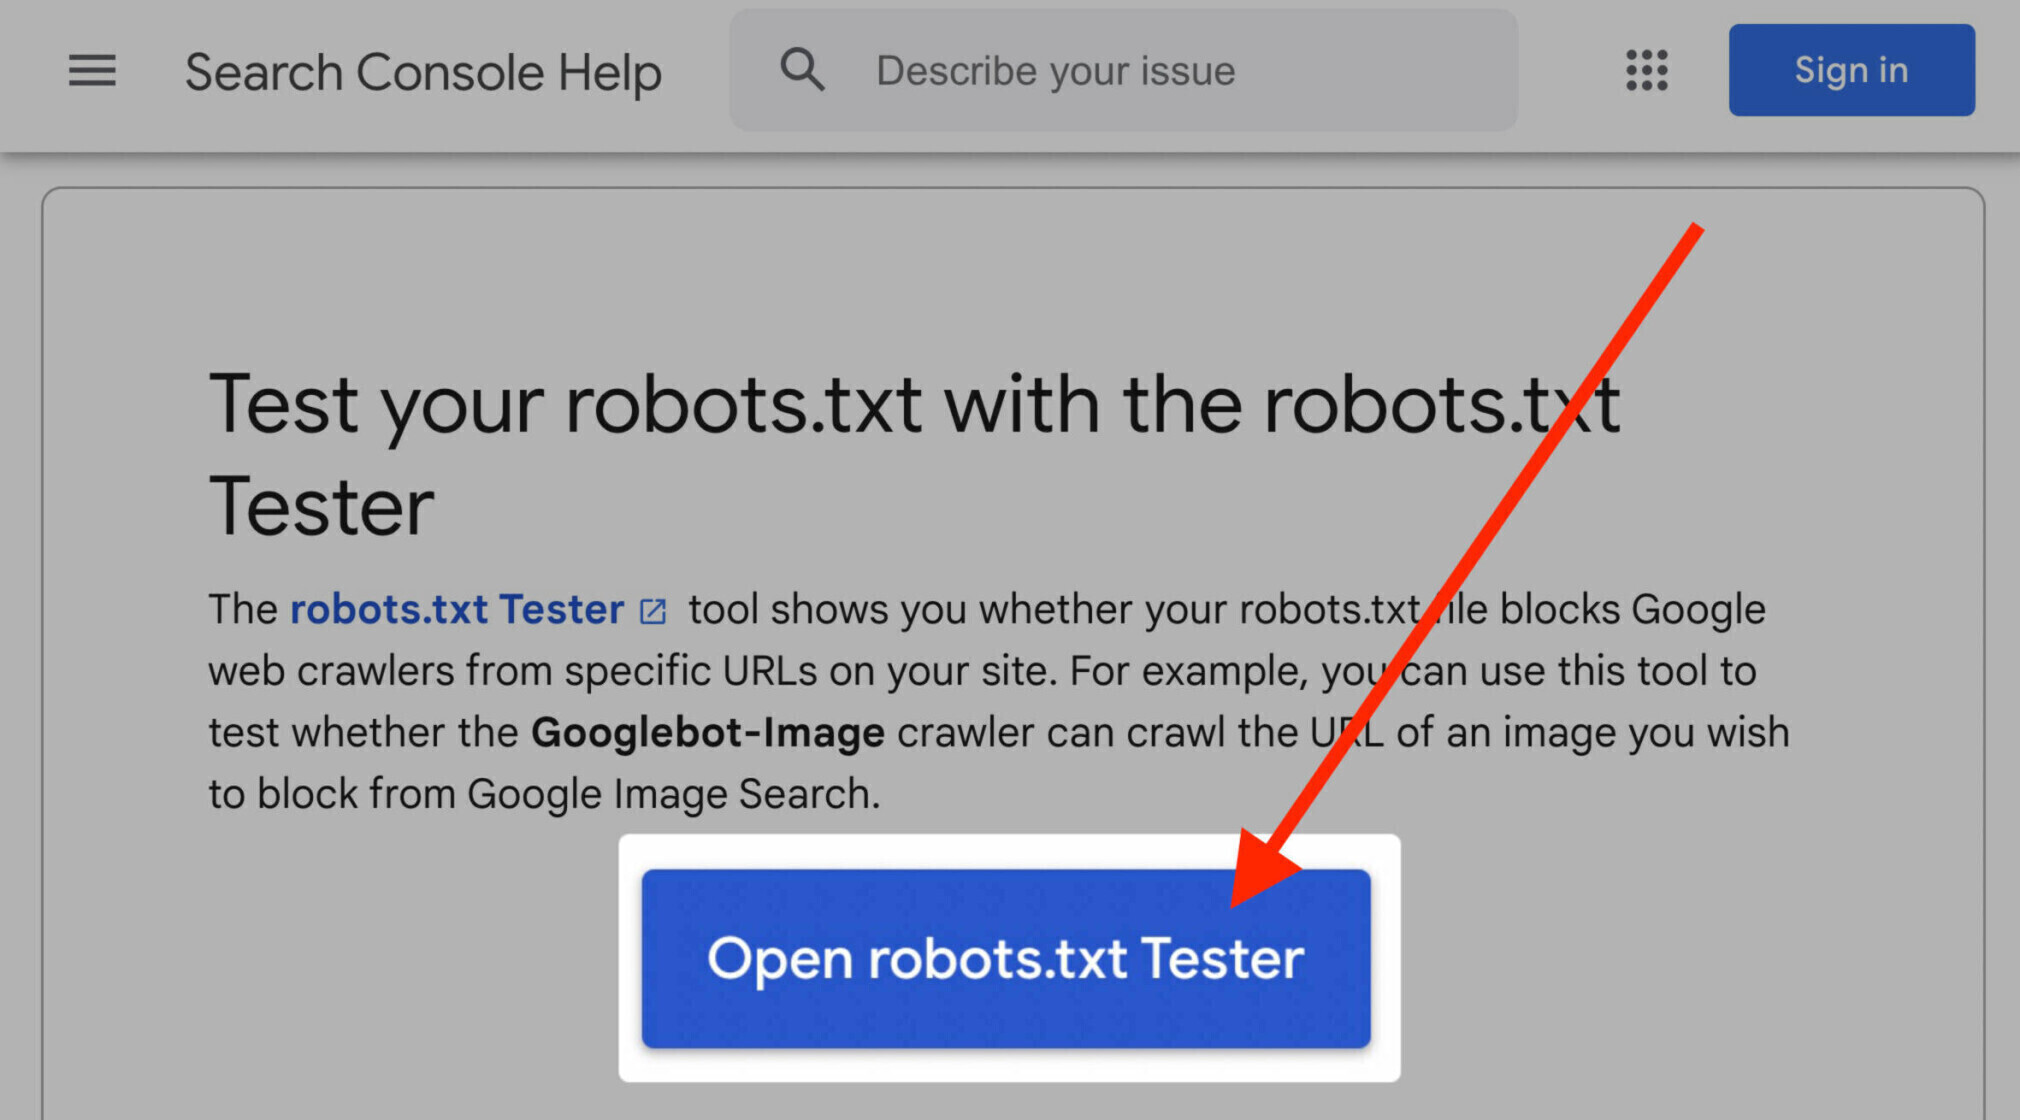
Since the second option is more geared toward advanced developers, let’s test your robots.txt file in Search Console.
Note: You must have a Search Console account set up to test your robots.txt file.
Go to the robots.txt Tester and click on “Open robots.txt Tester.”
If you haven’t linked your website to your Google Search Console account, you’ll need to add a property first.

Then, you’ll have to verify that you are the site’s real owner.

If you have existing verified properties, select one from the drop-down list on the Tester’s homepage.

The Tester will identify any syntax warnings or logic errors and highlight them.
It will also show you the number of warnings and errors immediately below the editor.
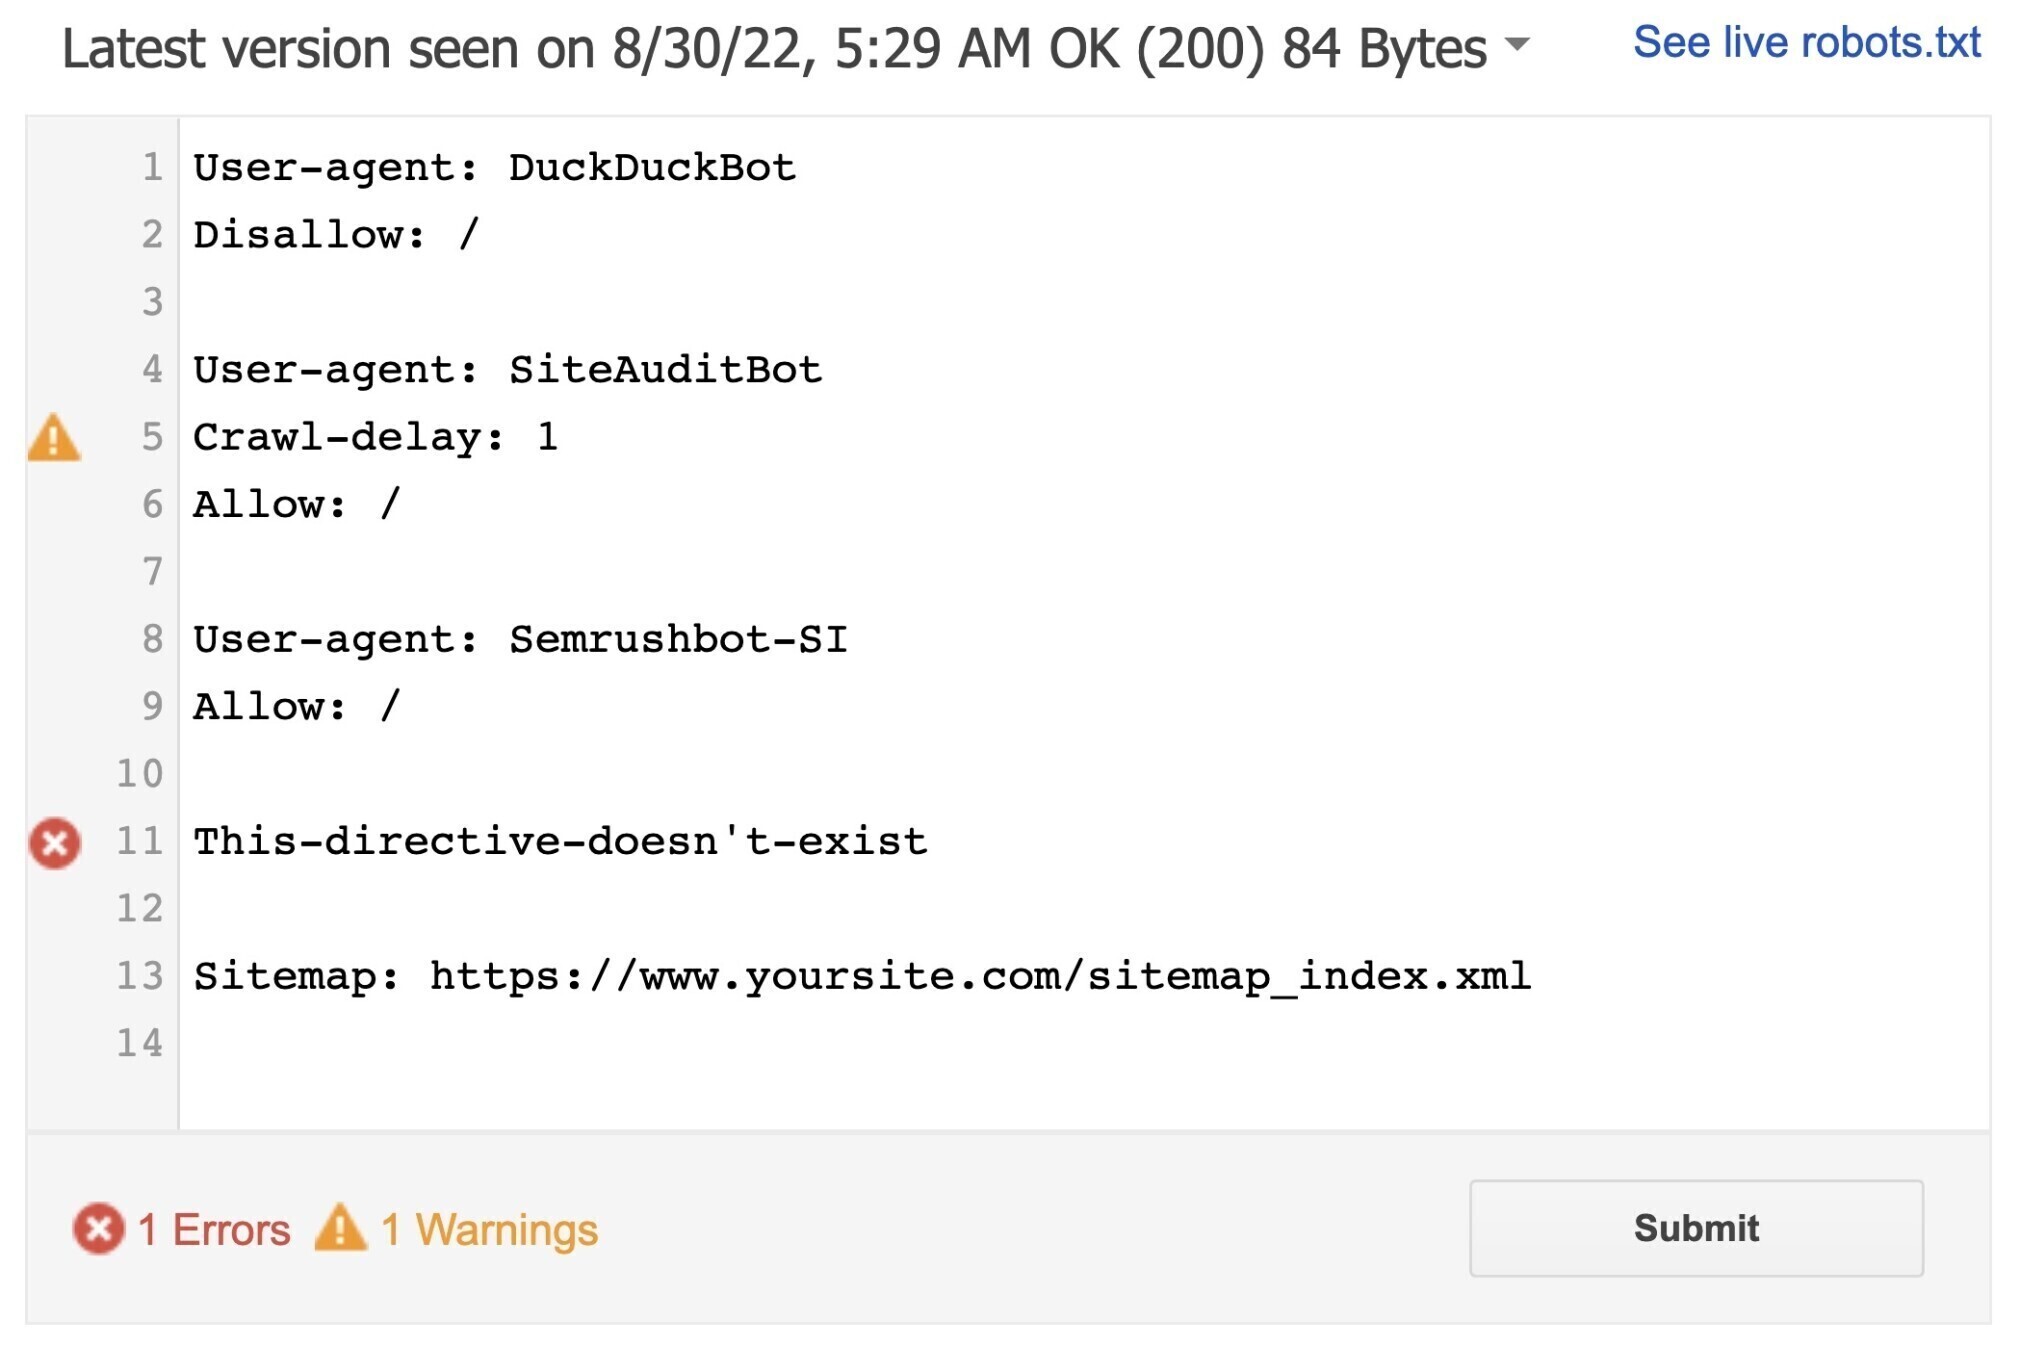
You can edit errors or warnings directly on the page and retest as many times as necessary.
Just bear in mind that changes made on the page aren’t saved to your site. The tool doesn’t make any changes to the actual file on your site. It only tests against the copy hosted in the tool.
To implement any changes, copy and paste them into the robots.txt file on your site.
Pro tip: Set up monthly technical SEO audits with the Site Audit tool to check for new issues regarding your robots.txt file. Keeping an eye on your file is important, as even minor changes to it can negatively affect your site’s indexability.
Click here to see Semrush’s Site Audit tool.
Robots.txt Best Practices
Keep these best practices in mind as you create your robots.txt file to avoid common mistakes.
Use New Lines for Each Directive
Each directive should sit on a new line.
Otherwise, search engines won’t be able to read them, and your instructions will be ignored.
Bad:
User-agent: * Disallow: /admin/
Disallow: /directory/
Good:
User-agent: *
Disallow: /admin/
Disallow: /directory/
Use Each User-Agent Once
Bots don’t mind if you enter the same user-agent multiple times.
But, referencing it only once keeps things neat and simple and reduces the chance of human error.
Bad:
User-agent: Googlebot
Disallow: /example-page
User-agent: Googlebot
Disallow: /example-page-2
Notice how the Googlebot User-agent is listed twice.
Good:
User-agent: Googlebot
Disallow: /example-page
Disallow: /example-page-2
In the first example, Google would still follow the instructions and not crawl either page.
But, writing all directives under the same User-agent is cleaner and helps you stay organized.
Use Wildcards to Clarify Directions
You can use wildcards (*) to apply a directive to all user-agents and match URL patterns.
For example, if you wanted to prevent search engines from accessing URLs with parameters, you could technically list them out one by one.
Bad:
User-agent: *
Disallow: /shoes/vans?
Disallow: /shoes/nike?
Disallow: /shoes/adidas?
But that’s inefficient. You can simplify your directions with a wildcard.
Good:
User-agent: *
Disallow: /shoes/*?
The above example blocks all search engine bots from crawling all URLs under the /shoes/ subfolder with a question mark.
Use “$” to Indicate the End of a URL
Adding the “$” indicates the end of a URL.
For example, if you want to block search engines from crawling all .jpg files on your site, you can list them individually.
But that would be inefficient.
Bad:
User-agent: *
Disallow: /photo-a.jpg
Disallow: /photo-b.jpg
Disallow: /photo-c.jpg
It would be much better to use the “$” feature like so:
Good:
User-agent: *
Disallow: /*.jpg$
Note: In this example, /dog.jpg can’t be crawled, but /dog.jpg?p=32414 can be because it doesn’t end with “.jpg.”
The “$” expression is a helpful feature in specific circumstances like above, but it can also be dangerous.
You can easily unblock things you didn’t mean to, so be prudent in how you apply it.
Crawlers ignore everything that starts with a hash (#).
So, developers will often use a hash to add a comment in the robots.txt file. It helps keep the file organized and easy to read.
To include a comment, begin the line with a hash (#).
Like this:
User-agent: *
#Landing Pages
Disallow: /landing/
Disallow: /lp/
#Files
Disallow: /files/
Disallow: /private-files/
#Websites
Allow: /website/*
Disallow: /website/search/*
Developers occasionally include funny messages in robots.txt files because they know users rarely see them.
For example, YouTube’s robots.txt file reads:
“Created in the distant future (the year 2000) after the robotic uprising of the mid 90’s which wiped out all humans.”

And Nike’s robots.txt reads “just crawl it” (a wink to their “just do it” tagline) and also includes their logo.

Use Separate Robots.txt Files for Different Subdomains
Robots.txt files only control crawling behavior on the subdomain where they’re hosted.
So, if you want to control crawling on a different subdomain, you need a separate robots.txt file.
So if your main site lives on domain.com and your blog lives on the subdomain blog.domain.com, you’d need two robots.txt files.
One for the main domain’s root directory and the other for your blog’s root directory.
Keep Learning
Now that you have a good understanding of how robots.txt files work, here are a few more articles you can read to continue learning: